Well I FINALLY have a project to share with you today. This is a little something I put together a while ago -- so I haven't actually DONE any sort of home improvement/crafty project in like THREE weeks. Seriously. I walked into Joanne's last night and I was there for over an hour -- as if I had never been in a craft store before. I was finding all kinds of things to make and craft. I'm sure I looked a little on the nuts-o side. But I was feeling some withdrawal after being on vacation!
But enough of that -- let's get to this long-overdue project!
A few months ago we went on a our annual family vacation to a lake up north, where my very talented hubby took this picture:
It's turned into one of my absolute favorite pictures -- it's so beautifully framed and the colors are just perfect. Like I said, I have a talented hubby!
I wanted to frame this picture, but I didn't want to just throw it in any old frame -- it's a special picture and I wanted to do something special to it. So I decided to make a distressed photo board.
I started out with a 16 x 20 print of my photograph (which cost me about $17.00 -- but I'm sure you could find a better deal if you looked around for coupons and online shopping codes). I also used a pallet that we had in our garage from a Menard's Delivery earlier in the summer.
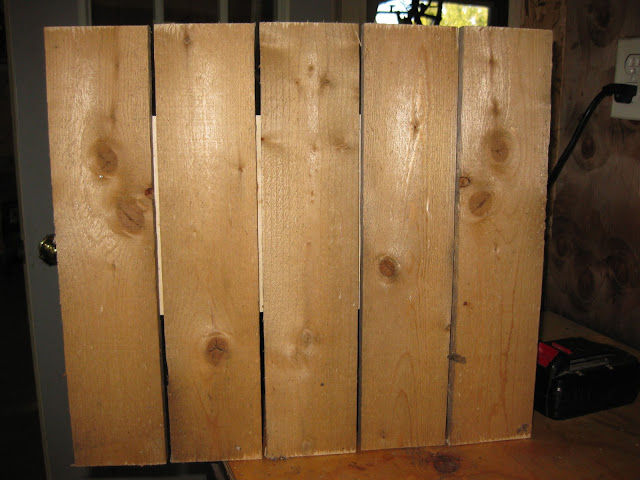
Now comes a little bit of math -- I cut my boards to be 16" long (the same height as my photo I ordered). I decided to cut five boards to stack across and left an equal amount of spacing between them to be a little more rustic looking.
I laid all my boards out on a flat surface and used a strait edge to keep them even while I used a screw as a spacer to equally space all my boards (real technical, I know). Then I took another board and laid it across all my boards and nailed it in place -- this is to keep my measured 16" boards in place.
So when I was all done assembling my boards it looks something like this:
Now comes the fun part -- adding the photo. I used Mod Podge (of course! Would I really use anything else!?!) and attached the back of the photo to the boards, and then I went over the top. Don't worry about the edges really laying flat -- we'll fix that later.
Once it was Mod Podged on (and not fully dry) I took the end of a paint brush and scored my picture where the gaps in my boards are. A word of warning though -- be careful that you don't scratch the picture when you are scoring -- just a light scare should do the trick.
Let the Mod Podge dry, and you should have something like this. I originally planned on stopping here, but I just didn't like it. It needed a little something more.
It needed to be more rustic. And what doesn't say rustic like distressing?
I ripped my photo around the edges to give it a more natural feel. I didn't worry too much about keeping the edges strait since I wanted it to look unintentional.
Then I took a clothe and my favorite dark walnut stain and rubbed it along the edges of my photo, the edges of the boards and then along the sides of the boards.
NOW it feels finished. I'm not sure where to hang it yet; but I'm thinking MAYBE in our newly refinished sun room. You could do this with any picture you wanted to though -- it's a fun way to make a special picture stand out from the rest.
Linking up to:
Mondays:Between Naps on the Porch ; C.R.A.F.T; Craft-O-Maniac; Keeping it Simple; Mad in Crafts; Making the World Cuter; The DIY Showoff; The Girl Creative Tuesdays: All Thingz Related; House of Grace; I'm Topsy Turvy; Lucky Star Lane; Sugar Bee Craft Edition; The CSI Project; These Creative Juices; Today's Creative Blog Wednesdays: Blue Cricket Design; Creations by Kara; Debbiedoos; Domestically Speaking; My Backyard Eden; Night Owl Crafting; Seven Thirty Three; Someday Crafts; The Thrifty Home; Trendy Treehouse Thursdays: Beyond the Picket Fence; Craftastical!; Fireflies & Jellybeans; House of Hepworths; Life as Lori; Somewhat Simple; The Shabby Chic Cottage Fridays: Chic on a Shoestring; Finding Fabulous; Fingerprints on the Fridge; Frou Frou Decor; Frugal & Fabulous Design; It's a Hodge Podge Life; It's Fun to Craft!: Just a Girl; Remodelaholic; Simply Designing; The Shabby Nest; Tatertots & Jello Weekend: A Little Lovely; Be Different Act Normal; Funky Junk Interiors; House of Thrifty Decor; I Heart Naptime; Kuzak's Closet; Under the Table & Dreaming


0 Hand-Me-Downers Shared:
Post a Comment
Thanks so much for taking the time to comment! I read every single one...and LOVE visiting all your blogs in return!
Note: Only a member of this blog may post a comment.