Showing posts with label lights. Show all posts

Monday, September 6, 2010

Monogrammed Light Shade (plus a monogram print for you)!


So I'm sure you've kind of noticed that I'm over my love for beige and brown.  All I want to do is bring in the light and bright.  I recently got my hubby on board with me .... and he surprised me with a new bedding set!  And to make it better it was one that I had been eying at Target for quite sometime (don't worry it was on a major sale and we had a 10% off coupon).  Isn't he sweet!?! Maybe I'm biased. :)

Well since we got our new bright and beautiful comforter and  pillows, I realized that our bedside lamps really didn't go anymore.  They were from my "brown and beige period".


I'm sure you can guess why they're outside, right??!?  SPRAY PAINT! :)  I put bags of the light socket and switch part because I didn't want to get paint on those.  I used a Valspar metalic paint this time.


Now to the fun part....the monogram lamp shade.

 
Here's what you will need make your own monogrammed lamp shade:


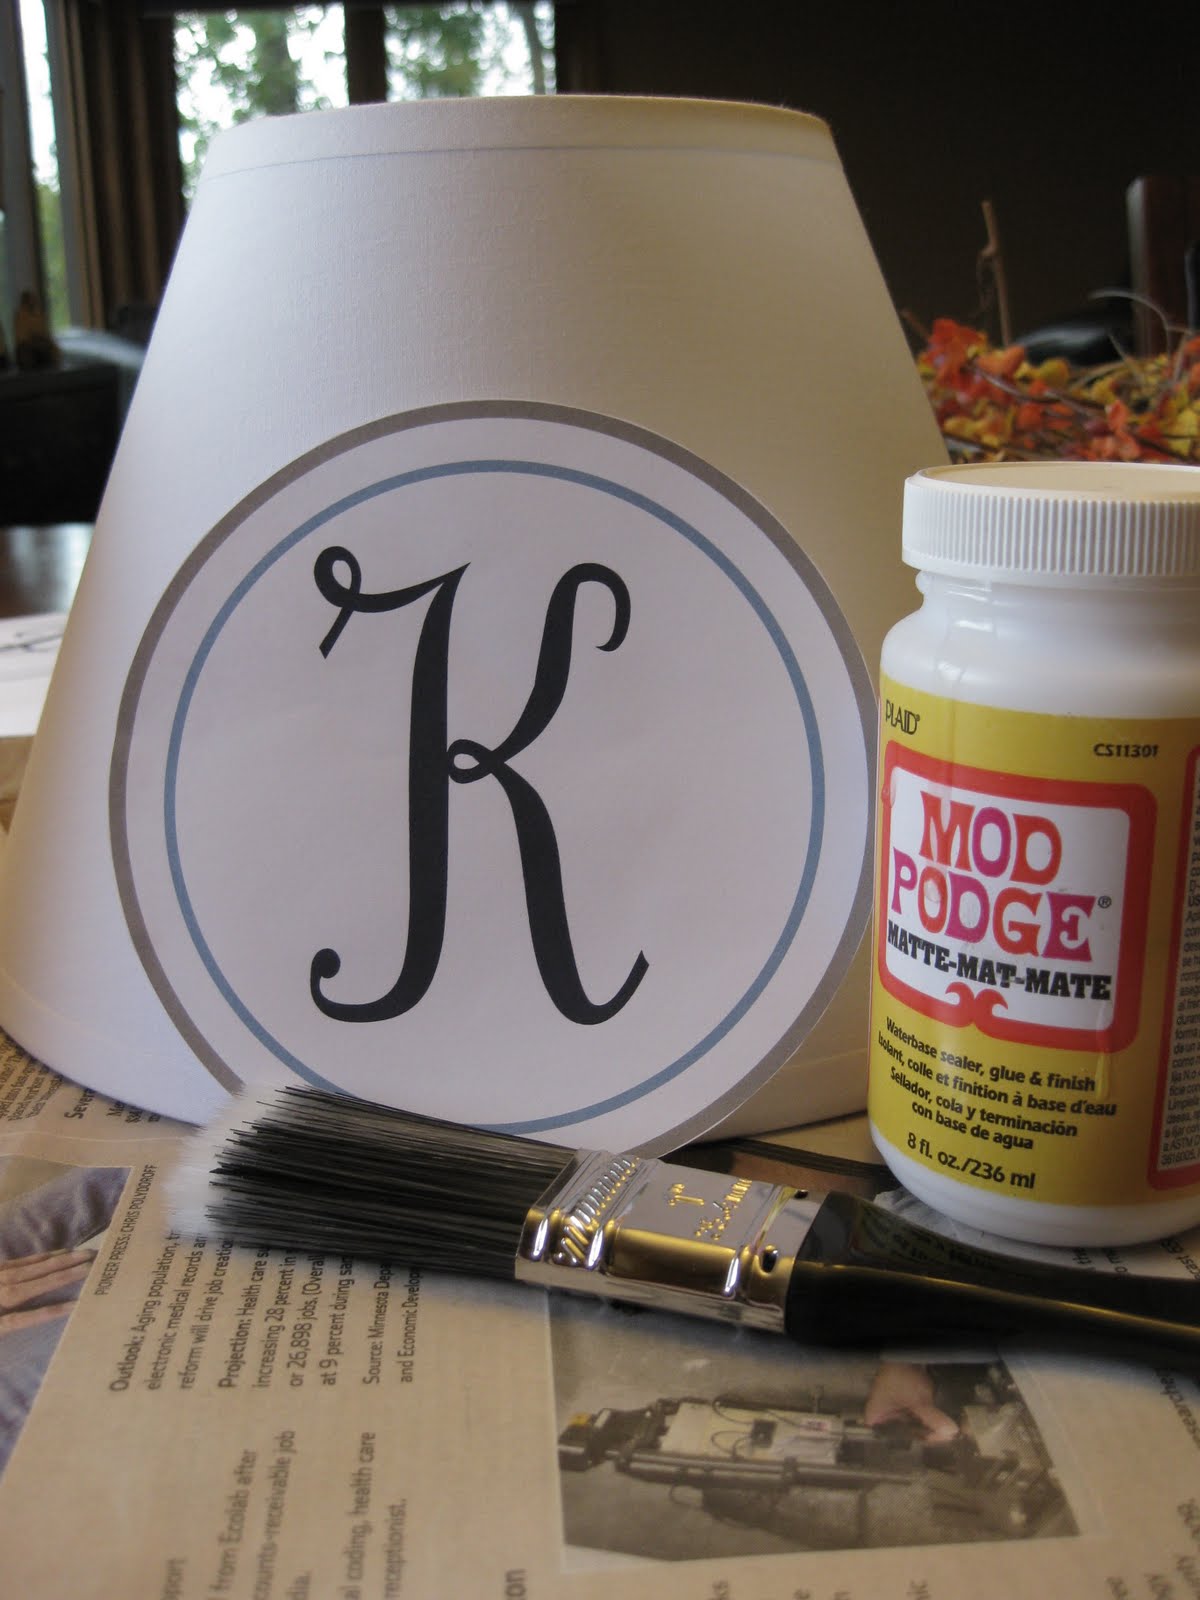
- Printed Out Monogram
- Mod Podge
- Paint Brush
- Lamp Shade

I totally wish I had thought of doing a fun border on the inside ring before I had Mod Podged my print-offs on.  But once my monograms were on I didn't want to peel them off and start over.  Buuuuut, I did make some monograms with a foliage border on the middle circle....JUST FOR YOU! :)  


I cut out the monograms and Mod Podged them onto my lamp shades.   

I will note that my printer ink bleeds when it gets wet, so I put on a VERY thing layer of the Mod Podge ON THE BACK of the monogram.  I didn't put any Mod Podge over the top because I didn't want it to smear all over the place.

And here are my new bright lamps:


Do you LOVE them!?!  I think they really "go" with our new look.  And here they are in their new home:

Linking up to:
Mondays:Between Naps on the Porch ; C.R.A.F.T; Craft-O-Maniac; Keeping it Simple; Mad in Crafts; Making the World Cuter; The DIY Showoff; The Girl Creative Tuesdays:  All Thingz Related; House of Grace; I'm Topsy Turvy; Lucky Star Lane; Sugar Bee Craft Edition; The CSI Project; These Creative Juices; Today's Creative Blog Wednesdays:  Blue Cricket Design; Creations by Kara; Debbiedoos; Domestically Speaking; My Backyard Eden; Night Owl Crafting; Seven Thirty Three; Someday Crafts; The Thrifty Home; Trendy Treehouse Thursdays: Beyond the Picket Fence; Craftastical!; Fireflies & Jellybeans; House of Hepworths; Life as Lori; Somewhat Simple; The Shabby Chic Cottage Fridays:  Chic on a Shoestring; Finding Fabulous; Fingerprints on the Fridge; Frou Frou Decor; Frugal & Fabulous Design; It's a Hodge Podge Life; It's Fun to Craft!: Just a Girl; Remodelaholic; Simply Designing; The Shabby Nest; Tatertots & Jello Weekend:  A  Little Lovely; Be Different Act Normal; Funky Junk Interiors; House of Thrifty Decor; I Heart Naptime; Kuzak's Closet; Under the Table & Dreaming


Thursday, June 17, 2010

Round Two of the PB Knock-Offs


Thanks to Leslie at Bargain Shopping Paradise for featuring my the PB chandelier:


And thanks to Allison at House of Hepworths for featuring my PB chandelier today!  Her blog is SO good -- not only is she ultra-crafty but her posts never fail to crack me up too!  So THANK YOU Allison!


And speaking of Pottery Barn Knock Off Lights ....... we're trying another one today.  Should I say that I really pulled out all the stops on my last one and this one is not nearly as exciting?  It's kinda true -- I was so happy with how the first light turned out that none of my other projects around the house are really measuring up.  Oh well, someday I'll get over my love affair with my light (maybe).

I saw this set of lovely lights in my PB catalog a few weeks ago (does anyone else continue to get these even though they never order anything??  Sadly, I'm just too cheap -- but I'm glad I have the catalog to flip through -- it makes me feel sophisticated).

Aren't these lovely?  And I especially the bluish green tinted one.  

So I kept my eyes open at the thrift store for the perfect piece of glass.  I scoured their million and one vases every time I was in.......and I finally found "the one."

The shape was darn-near perfect for my mini version of the PB light.  And I LOVE when you get to the register and it's on sale even MORE than you thought.  Cost for this little lovely?  $1.49 -- SCORE!

I was a little bummed that it wasn't colored -- but oh well I'll take what I can get.

Oh, wait -- it gets better - I found Pam's blog, Gingerbread & Snowflakes with a WONDERFUL tutorial on how to "tint" glass!  OMG -- could not even tell you how excited I was when I found this -- visit her tutorial -- it's awesome!


So the trick was to use Mod Podge and food coloring.  Well first, let me say that I have NEVER used Mod Podge before -- but I've heard AMAZING things about it and how addicting it is.  So I went out and bought some (did you know Joann's has a 50% off coupon this week?) with my coupon of course -- and I L-O-V-E this stuff! 


So I happened to find some Neon Food Coloring in my cupboard (no idea what I would have used this for -- but it came in handy this time!).  I put a few drops of the neon blue and mixed it with the Mod Podge like Pam did and painted it on.  After I painted it I stippled it with a paper towel -- real technical using paper towels and all, I know.


I know it looks quite electric-blue in the picture -- but as it dried it mellowed out. 


Next step was the lighting portion of it.  If you look at the PB light, there isn't a cord going through the glass -- it simply gets pushed out the top.  So I used the wires and switch from this light:

It's not too hard to get the wires out -- just unscrew the bottom wing-nut:


The bottom of the lamp just comes right off and the wires can be pulled out, but first you need to detach them from the switch part at the top of the light near where the bulb goes.


Unscrew the top by the actual switch and pull that bottom cover off.

**NOTE -- You could just as easily buy a lamp kit at the hardware store instead of reusing an old lamp.  It would probably be easier. :)


I unscrewed the screws that were holding the wires to the switch of the light.  Once the wires are unscrewed they can slide through the base of the lamp.  Now all you should have are the switch part and a black plug-in cord. 


Then put everything back together without the base or the glass part (I'll be using the base for another project).

What you should end up with is the top part of the lamp where the light bulb goes and the black cord that you plug into an outlet.

This part will sit in the top of the vase.


For the final part of my light I had really wanted a simple round lamp shade -- but I couldn't find one in the size I wanted or in the price range I wanted.  So I decided to makeover a lampshade that I had lying around the house.

I LOVED Amy's tutorial over at The Idea Room for a Rosette Lamp Shade.  She did an adorable lamp for her daughter that had a TON of the cutest little flowers on it.  I didn't do as many as she did but I did take her idea in using one of my hubby's old t-shirts he was going to throw away.

I cut it up into strips and rolled away!

I only did five and put buttons in the middle of each one.

The buttons were ones I found at Joann's for $1.50.


I think they turned out pretty good for my first try.

And are you ready for our lamp reveal!?!

I'm in love with how the glass turned out.  Pam is an absolute genius! 

I'm definitely going to be using the glass-Mod Podge-food coloring on other pieces.


Total for my lamp:

Vase:  $1.50
Light:  $2.99 (plus I can reuse the base for another project)
Buttons:  $1.50
Mod Podge:  $3.49 (and I'll be reusing this - a lot!)
TOTAL:  $9.48 (compared to $99.00 for the PB one!) 

I'll be linking up to these parties today.

Wednesday, June 9, 2010

Orange You Glad We're Making This Over??

Yes....we're very punny over here at the Hand Me Down House (hopefully you caught our corny joke!).

This very orangey light was one of the first things people saw when they came into our house....and well, it's VERY orange:

Are your eyes on fire like this lamp appears to be??

This "beauty" was from Target (my FAV store!) -- and well, as you can see it didn't really go with our decor.


So we took off the shade (just screwed off).  and pried apart the clasps that were holding each orangey plastic peice inside the frame.


I initially tried to pain the shade peices, but it made them too dark.

On to Plan B (does this happen a lot in your house?  It definitely does in ours -- or a Plan C).


PLAN B?  Vellum!

(I should note that we left our new light on for quite sometime with the velum in place to make sure we weren't going to oh, I don't know, burn our house down or anything.  Luckily, my Mister is more logical than me -- I never think of these things, and it's honestly a wonder I don't cause more house-project-gone-wrong-accidents).

Once I found the right pattern of vellum, it was simple enough as trace, cut and place:


And VIOLA!  Our finished product -- and for only a couple bucks!


Related Posts with Thumbnails