Showing posts with label thrifting. Show all posts

Thursday, September 16, 2010

Fall Candlestick Topiaries

Time for more fall crafts! :)  Speaking of fall -- don't forget -- today is the last date to enter Ramble Shamble's fall earrings giveaway!

Well you all know how much I LOVE a cheap and easy, crafty project -- and that's JUST what today is. I saw this idea at a store somewhere -- but of course, I can't remember where. Oh well -- just know it's not my idea. :)

I found this set of candlesticks at the thrift store for $2.99 each:


I cleaned them off, took my trusty can of spray paint and gave them a few shiny coats. :)  I used the same paint here as I did on my night table lamps.  I made it super easy on myself and painted the candlesticks and lamps at the same time.  Not that I don't LOVE to spray paint -- but the easier the better, right!? :)


The second step was to take some fall floral leaves and put them in the candle holder.  I used some that I happened to find at the thrift store for $.99 -- but you KNOW the Dollar Store has TONS of cute fall leaves, too -- they're all over the place!

I wrapped several ends together and bound them with a rubber-band.  Then I put them into the candle holder and put little pieces of newspaper around them to hold the leaves in place in the candle holder.


 What do you think???  I just can't say no to a quick and inexpensive project -- so I think they're pretty cute. :) 


Linking up to:
Mondays:Between Naps on the Porch ; C.R.A.F.T; Craft-O-Maniac; Keeping it Simple; Mad in Crafts; Making the World Cuter; The DIY Showoff; The Girl Creative Tuesdays:  All Thingz Related; House of Grace; I'm Topsy Turvy; Lucky Star Lane; Sugar Bee Craft Edition; The CSI Project; These Creative Juices; Today's Creative Blog Wednesdays:  Blue Cricket Design; Creations by Kara; Debbiedoos; Domestically Speaking; My Backyard Eden; Night Owl Crafting; Seven Thirty Three; Someday Crafts; The Thrifty Home; Trendy Treehouse Thursdays: Beyond the Picket Fence; Craftastical!; Fireflies & Jellybeans; House of Hepworths; Life as Lori; Somewhat Simple; The Shabby Chic Cottage Fridays:  Chic on a Shoestring; Finding Fabulous; Fingerprints on the Fridge; Frou Frou Decor; Frugal & Fabulous Design; It's a Hodge Podge Life; It's Fun to Craft!: Just a Girl; Remodelaholic; Simply Designing; The Shabby Nest; Tatertots & Jello Weekend:  A  Little Lovely; Be Different Act Normal; Funky Junk Interiors; House of Thrifty Decor; I Heart Naptime; Kuzak's Closet; Under the Table & Dreaming


Friday, September 3, 2010

Double Up!

Okay -- so I'm sure by now you're all getting sick of my bathroom redo -- but bear with me -- I've got one more little addition to that bright new space. :) (If you want to catch up on the bathroom projects, you can find them here, here and here).

I think you'll see where I'm going with this...but I had this huge empty wall behind the door -- and it was just SCREAMING for some attention to turn it into a real looker.


Oh sad, bare wall!  Well that's about to change -- because I found a plethora of unique, unwanted frames at the thrift store last week!


As you can see some of them need some serious color-changing!  I spray painted these soon-to-be beauties with Rustoleum Semi-Gloss White and let them dry.  

Next step was to take some of those decoupage letters you can find a a thrift store and spray paint those as well.  I chose Rustoleum metallic silver for the letters -- I wanted them to stand out from the frames.  (Sorry no pics -- it's pretty self-explanatory though!) :)

Ready to see my attention grabbing wall now!?


There you have it!  I chose to double up my frames since I didn't have a lot of space width-wise to work with.  I kind of like them better that way, since the frames that ended up being in the middles are actually duplicates.  And what do you think of the letters??  I was a little apprehensive about painting cardboard metallic -- but I think it makes them look pretty "metally".


Now I promise -- I'm almost done with showing you this teal, teal bathroom! :)

Linking up to:
Mondays:Between Naps on the Porch ; C.R.A.F.T; Craft-O-Maniac; Keeping it Simple; Mad in Crafts; Making the World Cuter; The DIY Showoff; The Girl Creative Tuesdays:  All Thingz Related; House of Grace; I'm Topsy Turvy; Lucky Star Lane; Sugar Bee Craft Edition; The CSI Project; These Creative Juices; Today's Creative Blog Wednesdays:  Blue Cricket Design; Creations by Kara; Debbiedoos; Domestically Speaking; My Backyard Eden; Night Owl Crafting; Seven Thirty Three; Someday Crafts; The Thrifty Home; Trendy Treehouse Thursdays: Beyond the Picket Fence; Craftastical!; Fireflies & Jellybeans; House of Hepworths; Life as Lori; Somewhat Simple; The Shabby Chic Cottage Fridays:  Chic on a Shoestring; Finding Fabulous; Fingerprints on the Fridge; Frou Frou Decor; Frugal & Fabulous Design; It's a Hodge Podge Life; It's Fun to Craft!: Just a Girl; Remodelaholic; Simply Designing; The Shabby Nest; Tatertots & Jello Weekend:  A  Little Lovely; Be Different Act Normal; Funky Junk Interiors; House of Thrifty Decor; I Heart Naptime; Kuzak's Closet; Under the Table & Dreaming


Have you entered the Village Boutique Giveaway yet!?! 

Wednesday, September 1, 2010

More Thrift Store Treasures

It's time for another thrift store makeover today. :)  I hope your not getting sick of these -- because I'm definitely not getting sick of going hunting at the thrift store!  A few weeks back I found this bronze beauty:


 Okay -- and the best part of this was I didn't actually pay $3.99 - I got it on the yellow tag sale day -- so it was a mere $2.50.  Can't beat that right!?!  So first, I decided to spray paint this little lovely semi-gloss black.  It turned out to be not exactly what I wanted .... so back to the can of spray paint I went.  The second time around I chose white.  MUCH BETTER!  :) 

If you ever find a tray like this and you want to paint it -- there are little pins in the sides that you pull out and that releases the mirror from the framed part.  Just don't lose the pins -- they're tiny! 

So here's what I ended up with:


I decided to fill it up with candles and seashells.  It goes perfectly in my new beachy bathroom!


Linking up to:
Mondays:Between Naps on the Porch ; C.R.A.F.T; Craft-O-Maniac; Keeping it Simple; Mad in Crafts; Making the World Cuter; The DIY Showoff; The Girl Creative Tuesdays:  All Thingz Related; House of Grace; I'm Topsy Turvy; Lucky Star Lane; Sugar Bee Craft Edition; The CSI Project; These Creative Juices; Today's Creative Blog Wednesdays:  Blue Cricket Design; Creations by Kara; Debbiedoos; Domestically Speaking; My Backyard Eden; Night Owl Crafting; Seven Thirty Three; Someday Crafts; The Thrifty Home; Trendy Treehouse Thursdays: Beyond the Picket Fence; Craftastical!; Fireflies & Jellybeans; House of Hepworths; Life as Lori; Somewhat Simple; The Shabby Chic Cottage Fridays:  Chic on a Shoestring; Finding Fabulous; Fingerprints on the Fridge; Frou Frou Decor; Frugal & Fabulous Design; It's a Hodge Podge Life; It's Fun to Craft!: Just a Girl; Remodelaholic; Simply Designing; The Shabby Nest; Tatertots & Jello Weekend:  A  Little Lovely; Be Different Act Normal; Funky Junk Interiors; House of Thrifty Decor; I Heart Naptime; Kuzak's Closet; Under the Table & Dreaming


Friday, August 13, 2010

C is for Canister

Sometimes I just CANNOT believe the stuff people throw away....all you other thrifters -- I'm SURE know what I mean.  Even if whatever it is looks like complete garbage, I know it can be fixed up -- so of course I can't understand why someone would get rid of such a "treasure"!  I'm hoping there are other people like me out there who get that item all fixed up and beautified,  and want to bring it back to whoever got rid of it and show them.  As if that is showing people I'm not in fact crazy and there was a "treasure" in there!  

But what I can't believe at all is the perfectly good things people get rid of -- take this Williams Sonoma canister pair I found last week:


Seriously -- Williams Sonoma.  The big one was $3.80 and the smaller one was $5.80 -- yes you read that right the smaller one was MORE than the bigger canister -- whatever, TOTALLY worth those prices. The small one still had the original price tag on it and it was $18.00.  And in my opinion, these were pratically brand new...there was absolutely NOTHING wrong with them except they were covered in dust.  (Probably no dustier than the rest of my house). 


All by themselves they are just fine.....although I wanted something a little more colorful.  Not that I don't love simple, white decor -- I just felt like these needed a little something.  I originally wanted to do vinyl on the front for whatever I used them for; but I can never make up my mind on things, so I knew I'd change what I put in these canisters several times.  Vinyl just doesn't always work for a mind-changer like me. :)    So I decided to go for some chalkboard paint instead.


I loved it ... but it still wasn't very colorful.  It needed some fun hue added to it.  It was calling out for some beautiful accessory to be added.....and so I did:


I took two strands of beads I put together and braided them together with green ribbon.  Then all I had to do was tie them around my canisters.

Each canister bead braid is different but has the same type of beads and color scheme.


And I should be honest with you...there aren't actually cookies in my bigger canister....yet.  I wish there were though!   I better erase that before my hubby opens it up to find an empty canister.  

I do use my other canister for coffee -- so I get to use it every day.   And I LOVE it! :)   It makes me smile just seeing it -- what a way to start the morning.


So my grand total for the whole project is $22.10

$9.60 for the canisters
$12.50 for the beads


Linking up to:
Mondays:Between Naps on the Porch ; C.R.A.F.T; Craft-O-Maniac; Keeping it Simple; Mad in Crafts; Making the World Cuter; The DIY Showoff; The Girl Creative Tuesdays:  All Thingz Related; House of Grace; I'm Topsy Turvy; Lucky Star Lane; Sugar Bee Craft Edition; The CSI Project; These Creative Juices; Today's Creative Blog Wednesdays:  Blue Cricket Design; Creations by Kara; Debbiedoos; Domestically Speaking; My Backyard Eden; Night Owl Crafting; Seven Thirty Three; Someday Crafts; The Thrifty Home; Trendy Treehouse Thursdays: Beyond the Picket Fence; Craftastical!; Fireflies & Jellybeans; House of Hepworths; Life as Lori; Somewhat Simple; The Shabby Chic Cottage Fridays:  Chic on a Shoestring; Finding Fabulous; Fingerprints on the Fridge; Frou Frou Decor; Frugal & Fabulous Design; It's a Hodge Podge Life; It's Fun to Craft!: Just a Girl; Remodelaholic; Simply Designing; The Shabby Nest; Tatertots & Jello Weekend:  A  Little Lovely; Be Different Act Normal; Funky Junk Interiors; House of Thrifty Decor; I Heart Naptime; Kuzak's Closet; Under the Table & Dreaming


Wednesday, July 28, 2010

Double Framed Clock (and one for you too!)

So by now I'm sure you have realized that the thrift store is my friend (it should be your friend too).  I visit the thrift store weekly -- sometimes I leave with nothing, sometimes I leave with a bag of stuff.    For example, last week when I was there I found a sham for our bedding set from Target still new in the package.  SCORE!  And for two measly dollars I snatched that puppy right up.  Well I ALSO found these two sets of frames:


YIKES, right!?!  But I have to say I'm in LOVE with oval frames right now., and these frames had some character.  I was so excited when I found the first set and then I was ecstatic when I saw the second set.  I was actually going to make these into cute little hooks by adding glass knobs to them, but ended up changing my mind (I've been known to do that).

I decided on making a clock for our living room.  I spray-painted my frames a lovely shade of greyish blue.  I left the glass out of the frames for this project (I'm getting quite the collection of glass from frames -- I better find a project to use it all up!) 

I added some elegant scrapbook paper to the background of each frame.  Next I glued the smaller frame inside the bigger frame. 

Then it was time to add the clock kit, which I painted black.  I found the clock kit at Joann's and followed the instructions on it to install my clock and hands.  I cut holes in each of the frames to push the clock peices through, like this:


After the clock hands were in, I placed my frame on a picture frame stand and VIOLA!


 Would you like to know the best part!?!  I made TWO of these lovely double-framed clocks!  That means I get one and YOU get the other one!  Just my little way to say THANK YOU for reading.  Thanks all you lovelies, we reached (and passed!) 350 followers! YAY!

CONGRATS TO MICHELLE AT SOMEDAY CRAFTS WHO WON THIS CLOCK!!


Linking up to:
Mondays:Between Naps on the Porch ; C.R.A.F.T; Craft-O-Maniac; Keeping it Simple; Mad in Crafts; Making the World Cuter; The DIY Showoff; The Girl Creative Tuesdays:  All Thingz Related; House of Grace; I'm Topsy Turvy; Lucky Star Lane; Sugar Bee Craft Edition; The CSI Project; These Creative Juices; Today's Creative Blog Wednesdays:  Blue Cricket Design; Creations by Kara; Debbiedoos; Domestically Speaking; My Backyard Eden; Night Owl Crafting; Seven Thirty Three; Someday Crafts; The Thrifty Home; Trendy Treehouse Thursdays: Beyond the Picket Fence; Craftastical!; Fireflies & Jellybeans; House of Hepworths; Life as Lori; Somewhat Simple; The Shabby Chic Cottage Fridays:  Chic on a Shoestring; Finding Fabulous; Fingerprints on the Fridge; Frou Frou Decor; Frugal & Fabulous Design; It's a Hodge Podge Life; It's Fun to Craft!: Just a Girl; Remodelaholic; Simply Designing; The Shabby Nest; Tatertots & Jello Weekend:  A  Little Lovely; Be Different Act Normal; Funky Junk Interiors; House of Thrifty Decor; I Heart Naptime; Kuzak's Closet; Under the Table & Dreaming

Wednesday, July 21, 2010

Hydrangea Topiary

Don't forget - today is the last day to enter our giveaway!

With summer in full swing in Minnesota, we've been enjoying fresh flowers a lot.  And I LOVE fresh flowers right from the garden.  But sadly they don't last forever.  Before I know it, it's time to replace my little lovelies with a new arrangement.  And even though artificial flowers last forever, they just can't measure up to the real ones....most of the time.

I keep seeing great projects out here in blogland where people make fake flowers look SO real, and so beautiful.  I wanted to get in on the action....so I thought I would give fake flowers a try this week.

I had found this ugly vase/urn thing at the thrift store last week. 


Eeeeeew!  The green and gold were just NOT working for me.  But what a cute little shape, right?  (I'm just kicking myself that I didn't buy the two other matching urns that were there.  Oh well.).  Step one was to spray paint that vase a more flattering color.

I just needed something to put in my new thrift store find.  While I was at Joanne's I saw that they had all their spring flowers on sale for 70% off.  It didn't matter to me that they were spring flowers - they're still flowers, aren't they!?!?

So I bought five hydrangea stems.

Pretty, right?  I didn't care that they were spring colors - I loved the pink and peach in the middle of the flowers.

I also found a floral  styrofoam ball lying around that I never used for another craft (which just happened to fit perfectly into my new urn - yay!).

I took my hydrangea stems and cut them apart.  I cut each individual flower off of main stem.  You'll want it so that there's about an inch to half inch of stem left off the flower base.


Just like so.  Then I took a pencil and poked a hole into the styrofoam ball (a really professional technique, I know).  


Take one of the hydrangea flowers and poke it into the hole.  You want the stem to go through part of the styrofoam, but you don't want to bend the stem.  I tried poking it in on it's own first and I ended up bending the wire stem and ruining the flower.  So then I tried the pencil method - it worked really well.  Just be careful not put a hole that is TOO big in the styrofoam, otherwise the flower will fall out.


There, one done!  Only like a million more flowers to go.  Now continue pushing flower stems into the styrofoam ball until it is covered with flowers, or your thumb feels like it's going to fall off -- whichever comes first.  My holes ended up being about 1/2 inch apart, depending on the size of the flower I put in.  I tried to make sure I had small and big flowers next to each other to give a varied, more natural look.

I used almost all of the five stems going around the topiary ball.  But I was SO incredibly thrilled with how my fake flowers turned out.  It actually turned out better than I had expected.  Here's what the hydrangea covered sphere looks like:


Do you love it??  Then I placed the topiary ball into my spray-painted urn:

Perfect!  Now I can enjoy "spring" flowers all year long!!

Here's the materials and cost breakdown for this project:

Floral or Styrofoam Ball:  Had on hand
Flower Stems (I used hydrangeas):  $1.05 each x 5 = 5.25
Urn, vase or pot:  $2.99
Spray Paint:  Had on hand
Scissors
Pencil

TOTAL:  $8.24

Not bad, right?  And don't worry, the thumb pain from pushing the flowers in isn't really all that bad - you'll forget all about it when you see your beauteous flower topiary. :)
Linking up to:
Mondays:Between Naps on the Porch ; C.R.A.F.T; Craft-O-Maniac; Keeping it Simple; Mad in Crafts; Making the World Cuter; The DIY Showoff; The Girl Creative Tuesdays:  All Thingz Related; House of Grace; I'm Topsy Turvy; Lucky Star Lane; Sugar Bee Craft Edition; The CSI Project; These Creative Juices; Today's Creative Blog Wednesdays:  Blue Cricket Design; Creations by Kara; Debbiedoos; Domestically Speaking; My Backyard Eden; Night Owl Crafting; Seven Thirty Three; Someday Crafts; The Thrifty Home; Trendy Treehouse Thursdays: Beyond the Picket Fence; Craftastical!; Fireflies & Jellybeans; House of Hepworths; Life as Lori; Somewhat Simple; The Shabby Chic Cottage Fridays:  Chic on a Shoestring; Finding Fabulous; Fingerprints on the Fridge; Frou Frou Decor; Frugal & Fabulous Design; It's a Hodge Podge Life; It's Fun to Craft!: Just a Girl; Remodelaholic; Simply Designing; The Shabby Nest; Tatertots & Jello Weekend:  A  Little Lovely; Be Different Act Normal; Funky Junk Interiors; House of Thrifty Decor; I Heart Naptime; Kuzak's Closet; Under the Table & Dreaming


Wednesday, July 7, 2010

A Partner for My Bench

I have a confession - I'm a thrift store lurker.  It's not as creepy as it sounds - I promise.  I'm one of those people who goes into a thrift store and more times than not, I leave with nothing.  But every so often I SCORE and get something wonderful.  According to my Grandma , you must go several times before you find a good deal.  (My thriftiness is a trait I've inherited from my mom and my Grandma -- and what a wonderful trait it is!) 

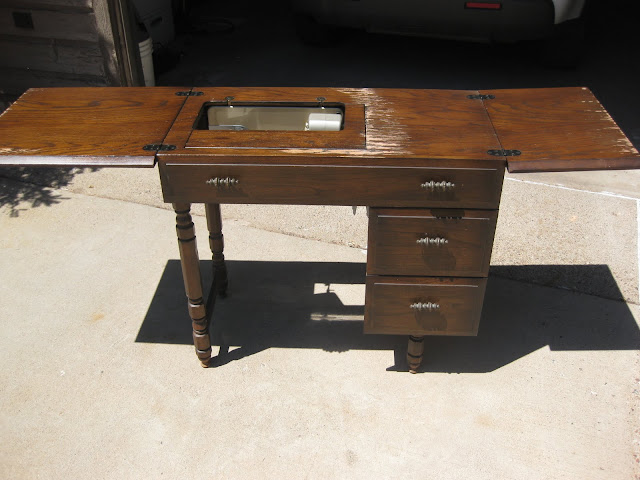
On one of my last thrift store trips I was  perusing the merchandise...not really expecting to find anything....and not really looking for anything particular.  But then as I walked by the furniture I saw this:


 A little ugly, a little worn -- but I loved the shape of it....especially the spindle legs and the handles (minus the dusty bronze color).  And it got better.....I opened it up:


Initially I couldn't decide if I wanted it or not.....(I get this trait of indecisiveness from my Mom and Grandma too -- not so thrilled about this one).  I thought and thought....went home, dreamed about it, thought about it some more -- you get the idea.  The next morning I had made my decision --  I wanted it.  I went back to the store and thought about it again, and checked it out to see if I could use my sewing machine with the table.  I determined that I could use the table with my machine and with that, I took it -- bought it, actually -- for $14.00. 

The machine that came with it seems very nice and well taken care of. (I think I'm going to keep it is a back up -- becuase I always manage to jam my machine while I'm in the middle of a project). 

So I took the whole table apart and took the hardware off -- painted it with my favorite Gloss White from Valspar and spray-painted all the hardware black.   And that was it -- so easy -- but so worth it!


Do you love it?  I couldn't be any happier with how it turned out.  Plus, doesn't my new light look perfect on this table???

Since I wanted to be able to use my machine with my new table, I fashioned a little "shelf" that sits 3 inches below the top of the table for my sewing machine to sit on.  Think of it almost like a floating shelf inside my table.  That way, the table top is flush with my machine. 


And do you see my tape measure?  I bought a fabric tape measure and Mod Podged it onto my table (is there anything Mod Podge can't do?). 

There -- my sewing bench finally has a matching partner.

My sewing table also came with a little spool basket -- but it was '70s yellow:


YIIIIIKES!  Nothing a little spray paint can't fix!


I'm SEW excited to use my new table!  Right now it's at home in our guest room -- but someday when we finish our office I'm hoping there will be a spot in there. 


Linking up to:
Mondays:Between Naps on the Porch ; C.R.A.F.T; Craft-O-Maniac; Keeping it Simple; Mad in Crafts; Making the World Cuter; The DIY Showoff; The Girl Creative Tuesdays:  All Thingz Related; House of Grace; I'm Topsy Turvy; Lucky Star Lane; Sugar Bee Craft Edition; The CSI Project; These Creative Juices; Today's Creative Blog Wednesdays:  Blue Cricket Design; Creations by Kara; Debbiedoos; Domestically Speaking; My Backyard Eden; Night Owl Crafting; Seven Thirty Three; Someday Crafts; The Thrifty Home; Trendy Treehouse Thursdays: Beyond the Picket Fence; Craftastical!; Fireflies & Jellybeans; House of Hepworths; Life as Lori; Somewhat Simple; The Shabby Chic Cottage Fridays:  Chic on a Shoestring; Finding Fabulous; Fingerprints on the Fridge; Frou Frou Decor; Frugal & Fabulous Design; It's a Hodge Podge Life; It's Fun to Craft!: Just a Girl; Remodelaholic; Simply Designing; The Shabby Nest; Tatertots & Jello Weekend:  A  Little Lovely; Be Different Act Normal; Funky Junk Interiors; House of Thrifty Decor; I Heart Naptime; Kuzak's Closet; Under the Table & Dreaming

Visit thecsiproject.com

Related Posts with Thumbnails