Monday, May 31, 2010

It's All in the Numbers - Part Deux!

Well as promised last week (when I shared with you a house number makeover).....I have a second set of house numbers to show you.

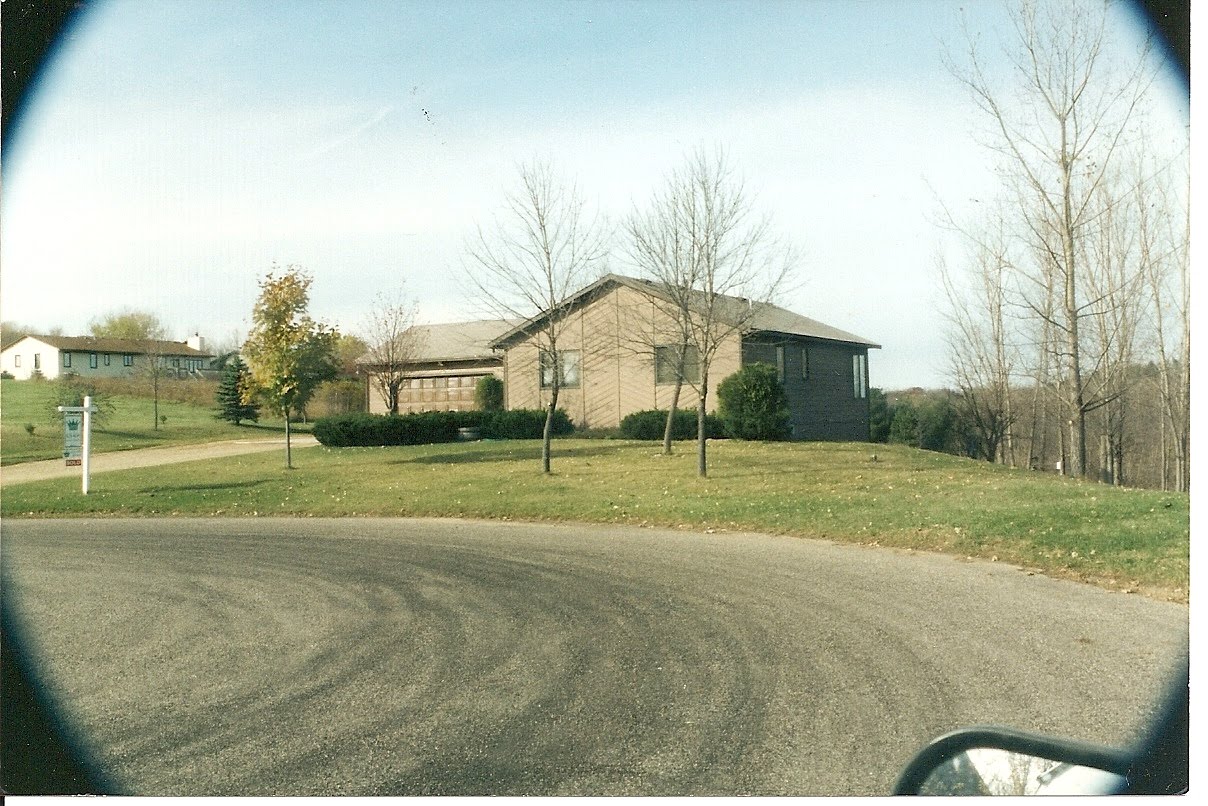
This time we wanted to redo our house number sign down by the street.  As you can see ours was a little scary and should have been replaced quite some time ago.(Tetanus shot anyone?!?)


Originally I had wanted to do this from Roeshel at The DIY Showoff:

I can't even tell you how much I wanted these little lovelies in my yard (with my numbers of course!).  They are adorable!  I had been saving this idea in my "project-to-do" folder on my computer for months trying to figure out if I could  finagle this into the front of our house.

Sadly we couldn't find a good spot to put them where they could be seen from the street (and believe me we tried everywhere!) So for now I'm left to admire these.....

So that brought us back to square one...trying to come up with an idea for our hose numbers.  I absolutely loved the idea of incorporating flowers and plants in my house numbers.

That's when it came to me -- a flower box!  I should note before I go too far that I could have made this project much easier on myself....and just bought a window planter.  Sometimes I don't think of these things until I'm half way through with whatever mess I've started.  Needless to say, if I ever have to redo this project I'll give up the moo-la and splurge for the super-cute window boxes. 

Okay, back to the project.  I picked up some new house numbers ($1.49 each at Home Depot) and nailed them to the front of my "window box".

If you're curious about the box -- I unfortunately do not have instructions -- but How Does She has a wonderful tutorial on an adorable window box. Or you can always buy one if you find a good deal.  Side Note:  Of course when I checked the paper yesterday, I saw Menards has adorable window-boxes on sale for $6.00!!

Mine was made out of some left over scraps I had, so it didn't cost me anything.  Gotta love that!

After I built my box, I attached it to the current post that was at the end of our driveway.


Then I filled the box with dirt and flowers and gave them a nice long drink of water....have I mentioned it's been in the high 90's here?!?


And there you have it!  A much-improved-tetanus-free-flower little house number sign.


And today I'm linking up to these parties!

Visit thecsiproject.com


Friday, May 28, 2010

Framed Letter Friday Reveal


I know you've been waiting.....so here are the answers to today's Letter Art:


B: Wind- chimes


                    L:  Outdoor Chair Arm
O:  Pink Poppy


O:  Hose Spigot from our Rain Barrel


M:  Fence


 Have a wonderful Memorial Day!

Framed Letter Friday

It's already that time again!  Framed-Letter-Friday!!  We're very excited because this week we've kept with our outdoors theme (it is Spring after all!).  All the letters for "Bloom" today are found somewhere outside.  Some of these letters are a pretty easy guess....and with that said:


Feel free to take a gander at what the letters are -- and later on today we'll post the answers!

Thursday, May 27, 2010

Pink Poppies

Just a mini-post to share with you the wonder of my HUMONGOUS pink poppies that started blooming this morning.  I've been waiting for these since the start of spring:


Thanks for basking in their glory with me :)


What a beautiful world God created for us!

It's all in the numbers

We're continuing with our outdoor theme this week (even though outside is the last place we've wanted to be -- Mid-westerners aren't prepared for the high 90's temps!).

We've been wanting to do a little something with our front door area for a while.  We wanted to spruce it up without spending too much.  On top of that we didn't have the option of doing anything too permanent since we need to have our sun room roof replaced this summer (can I just say what a pain hail is?!?) and we're sure anything that is in the vicinity of the roof will be wrecked.

Well that left us with a few options.  We put some potted plants out...definitely a plus.  But there was something missing.  And that's where my little paint project began.

Here's a peak from earlier this spring (please excuse the shovels and rakes):
Blah -- just too drab!


The main thing we needed was a great house number sign.  The one that came with our little hand me down wasn't exactly making us fall in love with it, but we didn't want to get a brand new sign if this one already had our address on it.  It was time to put our creative hats on.

I picked up these from Home Depot (over by the millwork and moulding) -- they were only $3.00:


I taped the address numbers, since we were going to keep that part the same.  And you can see the new "flourishes" on the sign.  (I used some extra-strength outdoor wood glue).

Aaaaaand it's ready for paint!!


It definitely helped our front space a little.  But we needed to do a little bit more.  Then I had another idea......


EDIT:  We weren't loving the green (pictured above) -- luckily we were able to do a quick change with another can o' spray paint.  Blue was the color of choice this time:


Here's our little planter stand -- I think I had gotten it at Michael's for $10.00 several years ago....and it was really time for an update.  We gave it a new coat of blue paint to match our sign:


I did tape off the edges so I didn't get paint on to the metal parts.


Check back Monday because we'll do part two of our "Numbers" makeover -- that's right, there's still more!


I'm also linking up to the CSI Paint Challenge -- which was a total inspiration for this project!:

Visit thecsiproject.com


Wednesday, May 26, 2010

Transitions

Today we thought we'd share with you what your yard has looked like over the past fifteen years.....because we changed it again this past weekend.  We were playing the role of lumberjacks....cutting down and tearing out trees, bushes, shrubs and plants to let the light into our front yard again.  

This is the day our little hand-me-down went on the market in 1995.
This was like a completely clean slate --- and empty yard.


Several years later after some major landscaping and garage additions, my dad took this photo from the same place as the previous photo.  (Looks to me like this might be during the "Wild Flower Garden Gone Wrong" phase).


And here we are shortly before the hand-me-down was handed down....a beautiful fall day -- oh the changes this house will see:


Here's a picture from the same spot with our new mini-retaining wall.. and cleaned up a bit from the last picture (Spring 2010).


Now that it's summer the foliage has filled in and our house is hidden.....time for a change.....


Now for our latest tree-cutting, shrub-pulling, weed-whacking project: 


Trees, shrubs and weeds are gone!  There will definitely be an additional post like this one in the future...we just haven't decided what we want to do with the plants in front quite yet.

Here's another look at the front before and after:
AFTER:


Tuesday, May 25, 2010

Barrel o' Rain

Since our last post was about our garden planters and planting we thought today we'd continue with our gardening roll and share our DIY Rain Barrel with you.


Before we begin, let me say that ours is tailored to our needs and our uses.  We use a pump to get the rain water off of our pool cover, and we decided to run the discharge hose right into our rain barrel.  Our rain barrel can also be modified to use for a rain gutter.

To start we picked up a 50 gallon bucket/barrel.  Let me say that you could use anything.  We looked at using large blue barrel, but the pricing was a little out of our range.  So we went for the $25.00 50 gallon bucket from the hardware store.  We also picked up an outdoor hose bib.  (Specifically, we purchased a 1/2" and 3/4" flanged sillcock, about $5.00).


Kevin again took his speed-bore drill bit and drilled a hole into our barrel (be sure not to drill your hole too low and make sure you have enough room to hook up your hose)


Once the hole is drilled it's time to screw in the hosebib.  If you want extra reinforcement you can always put a bead of caulk around the base to seal your faucet or use Teflon plumbing tape around the threads.


After the faucet was in, we started work on the top.  We drilled small hole (similar to the one for the faucet) on the lid so Kevin could get the jig saw started to make an opening for the water to get into the barrel.


Once the hole was cut out of the top we sanded down the edges so there weren't any sharp pieces left.

We put some leftover window screen (from a previous project) under the hole on top to help keep leaves and other debris out.  And yes, we did use Duct Tape....perhaps it's a 3M thing??

SIDE NOTE:  We also drilled another hole in the top to put our pool pump discharge hose in to fill it up.  You wouldn't necessarily have to do this if you wanted to put your rain barrel under a rain gutter.


Finally, hook up your hose and get watering!  We used a portion of left over hose that we had laying around, but you could also use a soaker hose or regular hose.


Related Posts with Thumbnails